Digital "Ripping" Audio From CD For Use In Dalet
Digital "ripping" of audio from CD is the easiest way to get an exact audio copy of CD audio into Dalet. It's as easy as:
1. Inserting a CD
2. Starting Real Jukebox.
3. Selecting the tracks to "rip"
4. Dragging the tracks (now converted to audio files) from the C:\temp directory into a Dalet Surfer track.
BUT FIRST, you must make sure that you are able to find the tracks when they are converted to audio files. Here's how to set up the Real Jukebox on your computer.
1. Start Real Jukebox by double clicking on the RealJukebox
shortcut on your desktop ![]() ,
or by accessing it via the Start Menu (Start>Programs>Real>RealJukebox>RealJukebox).
(NOTE: Real Media Software has a tendency to market
their latest releases by asking you to download a new version. PLEASE DO NOT
DOWNLOAD THE NEW VERSION-SELECT THE 'REMIND ME LATER' if it appears
upon start up. Installing a new version may corrupt your current software,
will take unnecessary time, and isn't necessary to perform this task).
,
or by accessing it via the Start Menu (Start>Programs>Real>RealJukebox>RealJukebox).
(NOTE: Real Media Software has a tendency to market
their latest releases by asking you to download a new version. PLEASE DO NOT
DOWNLOAD THE NEW VERSION-SELECT THE 'REMIND ME LATER' if it appears
upon start up. Installing a new version may corrupt your current software,
will take unnecessary time, and isn't necessary to perform this task).
2. Click on Tools
from the drop down menu, and select Preferences...
This will allow us to select the destination for the audio files extracted
from the CD and the format of the audio file.
3. Choose the Music
Files tab and click on the File
Locations... button.
4. This will open the File
Locations dialog box. Check the Recorded
Music Files Location: box. If this is not set to C:\temp\, you
will need to set it properly. You can highlight the contents of this line
and type C:\temp\ or you can browse to it by clicking on the Browse...
button.

Once corrected, your File Locations dialog box should look like this:
Click OK to continue.
5. Select the Audio Quality tab. This is where you select the
file format of the audio tracks you extract from the CD. Notice you have a
choice of Wave Audio, MP3 Audio, or Real Audio with ATRAC3. It is recommended
by Dalet, that you use the Wave Audio fromat. This makes a file that is
very large in file size, but it will convert normally in Dalet without any
complications. If you need a smaller file size, MP3 will do but has a tendency
to complicate things with Dalet. To be sure, Wave Audio format is the most
reliable. After you make your selection, click OK
to return to the track selection process.
6. Now you must select the tracks to extract from the CD. On
the right side panel of Real Jukebox, there is a Check
All and a Check None
option. If you are not interested in extracting all the audio files, you should
check the Check None option
then check the check boxes on the left for the specific tracks you wish to
extract.
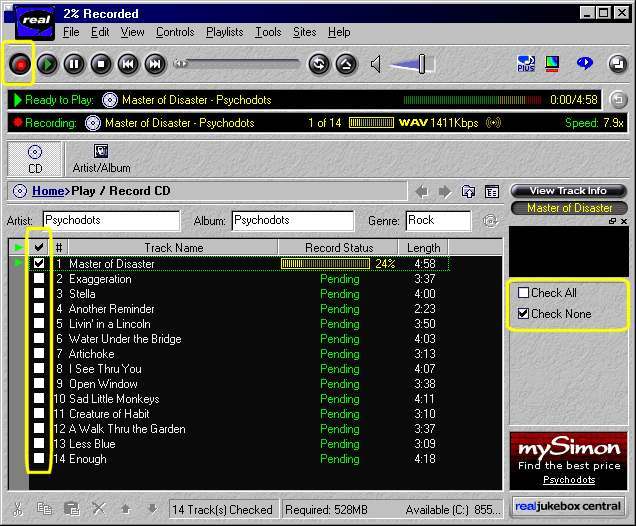
The illustration above, has track 1
- Master of Disaster selected for extraction.
7. When you have the tracks checked that you want to extract, click the Red Circle button or the Record button in the upper left of the Real Jukebox. You should see a progress indicator appear under the Record Status column.
8. When completed, browse to the C:\temp\ folder on your hard drive using My Computer or Windows NT Explorer. Your extracted file should be located there.
9. Left click and drag this file from the C:\temp\ directory
window into a track on the Dalet Surfer. Dalet will respond with a Building
Peak File message, followed by a wave image in the Surfer.
10. When the wave appears, you may want to listen to it to make sure it's transferred correctly, then save it immediately as an audio title by selecting File>Save Audio Title As... (title the file and select the saving location and click Set and OK).